How to make 3D fuse beads: boxes, dice and a stand-up tree
3D fuse bead pieces are made from several flat parts put together. The two easiest ways are slotting two pieces with an empty middle column into a cross, and building a box from six panels. Both work with 2.6 mm beads.
Three ways to make 3D fuse bead pieces
For a first try, start with the slot-together method: no glue, fewer mistakes. A box is simply glued together, as long as the parts are the right size.
| Method | Good for | Difficulty |
|---|---|---|
| Slot-together (two pieces in a cross) | Things that stand up: trees, flowers, animals | Easy (no glue) |
| Box (glue flat panels together) | Dice, trinket boxes, pen holders, little houses | Medium |
| Layering and bending | Pieces with thickness or curves | Challenging (watch out for burns) |
What you need
Most fuse beads are polyethylene, which ordinary craft glue does not hold well. Choose an adhesive whose package says it works on polyethylene (PE) or polypropylene (PP). A glue gun and its glue get hot, so an adult should use it.
- 2.6 mm fuse beads and a pegboard (sizing every part to fit a 29 × 29 pegboard makes things easier)
- Tweezers, an iron and ironing paper (baking paper works too)
- A flat, heavy book or magazine (to weigh the parts down while they cool)
- For boxes: an adhesive labeled for PP/PE or a hot glue gun, plus masking tape to hold parts while the glue dries
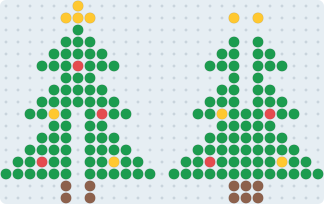
Slot-together method (3D Christmas tree)
A part made of 2.6 mm beads is about 2 mm thick, so it fits neatly into a one-bead (about 2.6 mm) gap. The same way you can make flowers, animals or stars that stand up.
- Make two parts with the same shape. Leave the middle column empty in the bottom half of the first and the top half of the second
- Cover with ironing paper and iron both sides on medium (especially around the empty column)
- Put a weight on them while still warm and let them cool flat
- Slide the second part down onto the first so the empty columns lock together
- If it feels loose, add a dab of glue where they cross
Box method (dice and trinket box)
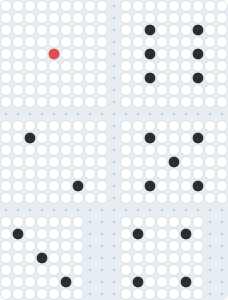
Each part is about one bead thick, so take that off when you size the parts and the box closes without gaps. For a die 9 beads across: top and bottom 9 × 9, front and back 9 × 7, sides 7 × 7.
For an open trinket box: a 13 × 13 base, front and back panels of 13 × 7, side panels of 11 × 7. The front and back stand on the edges of the base and the sides fit between them.
- Make all the parts, iron both sides and let them cool under a weight
- Glue the front and back panels upright on the base (the bottom face for the die), holding them with masking tape until dry
- Glue the side panels in between the front and back
- For the die, glue the top face on last
- Peel off the tape once the glue is completely dry
Tips for success
See common fuse bead mistakes for fixing warped pieces, and how to iron fuse beads for temperature and timing.
- Warped parts will not fit together, so always cool them under a weight after ironing
- Iron both sides. Parts ironed on one side only crack easily during assembly
- Think in beads, not centimeters (1 bead ≈ 2.6 mm, thickness ≈ 1 bead)
- Bending warm parts into curves can burn your fingers, so leave it to an adult
- With young children, let them place the beads and have an adult do the ironing and gluing
Try one of these patterns

FAQ
What do you use to glue 3D fuse bead pieces?
Most fuse beads are polyethylene, so use an adhesive labeled for PP/PE or a hot glue gun. Slot-together pieces need no glue at all.
Can you make 3D pieces with 2.6 mm mini beads?
Yes. The parts are smaller, which means one 29 × 29 pegboard holds all the parts of a die or a trinket box at once.
Can kids make them?
Slot-together pieces are fine for elementary school children working with an adult. Irons and glue guns get hot, so an adult should use them.